An AWS Cost and Usage Reports utility tool for asset/inventory management and archaeological analysis
Tracking assets and inventorying resources in AWS can be a challenge. There are service provider options, but most of them are tedious. AWS Config? Not cheap, not all resources are supported, and using aggregation excludes deleted resources while adding more clickOps and SQL to your day. Resource Explorer? More clickOps to get you a little bit of data that will likely leave you sad and with more questions to add to your unanswered questions.
BOYD is an archaeological excavation tool that takes a different approach. BOYD uses AWS Cost and Usage Reports (CUR) to create a virtual dig site for your resource inventory. BOYD helps users: explore and select from the hundreds of CUR columns available to identify values useful to your use case; organize and classify resources using filters, by resource or context; and query AWS APIs, Cloudtrail, and Config resource context for quick and easy bulk resource analysis. While the CUR itself also fails to provide a deep inventory of all your resources, it does provide centralized visibility into those that incur costs. With a little archaeological digging with BOYD, the CUR’s limitations can be extended through Config relationships and APIs to provide context to satisfy a multitude of use cases.
BOYD is a locally installed application that currently supports MacOS (Windows packaging in development). Basic usage allows users to select which columns they’d like to collect from CUR 1.0, 2.0 and FOCUS report versions in S3, aggregates the results on the local host, and provides flexible analysis and reporting. There are a few requirements that the CUR export use parquet format and be set to overwrite, but otherwise the user just needs AWS CLI access to the CUR S3 bucket. Advanced usage, i.e. “Dig Mode”, requires the ability to assume a role with SecurityAudit role privileges.
When you first launch BOYD, use the Settings page to select the AWS CLI profile that has access to the CUR S3 bucket, specify the bucket region and name, and the Find Prefix button will identify parquet sources in the selected bucket. With your CUR defined and saved, BOYD retrieves the schema and billing periods available.
If you’re a veteran of the CUR dataset, you can probably jump straight to Schema Selection, where you can choose which columns from the CUR you want to collect. For newcomers, the S3 CUR Explorer allows you to select a billing period and column and provides a statistical summary of the values present in the data. You don’t have to get column selection perfect the first time. BOYD is designed to allow users to add and remove columns as they go. For example, if you add a new tag value to your Cost Allocation Tags to be included in your CUR data, simply visit the Schema Selection page and refresh to add the new column as a selection then save. Previous collections before the value existed will have a default value indicating it is not available in that collection to maintain the consistency of the dataset. You can also use temporary columns if there’s something you need to generate context for and analyze quickly. Just add the column(s), perform a collection, analyze the results, then disable the column when finished. The next time you perform a collection the temporary column will be removed. We’ll talk more about column selection use cases in a future post, but the first key to BOYD running efficiently is collecting the columns that matter to your use case.
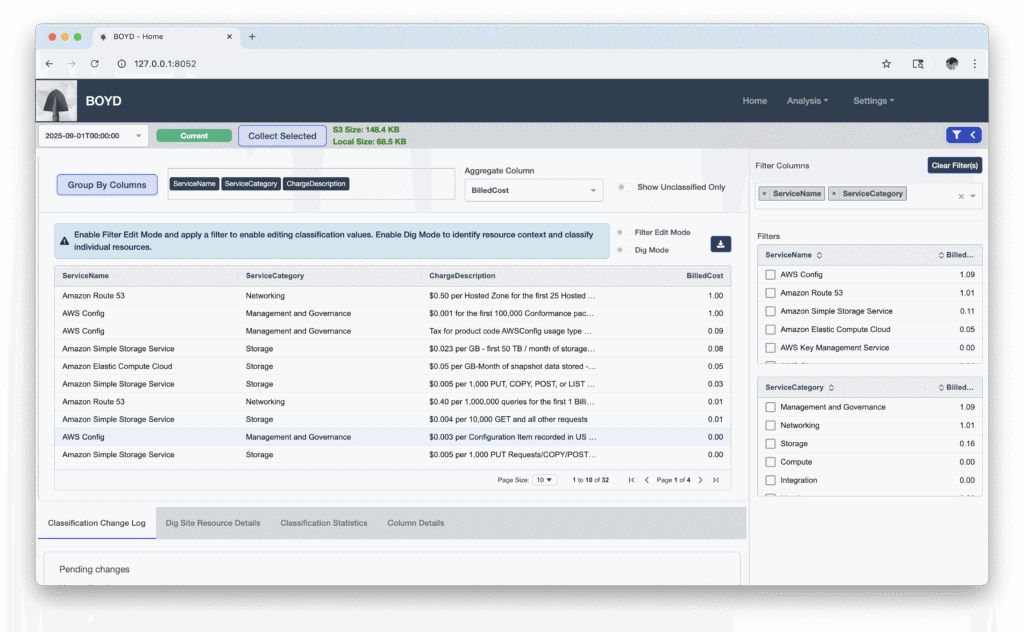
Once your columns have been chosen, the home page is your command and control center for the dig site. Selecting a billing period will show you how large the dataset is in S3. We recommend 2gb or less, but I’ll honestly admit there’s no right answer. I’ve seen multi-million dollar bills with tiny datasets and tiny bills with massive ones. It’s why we offer a 14 day trial and encourage users to meet the requirements before starting the trial so they have a chance to see how well it performs in their environment. If you’re data is within reason of the 2gb recommendation, there’s nothing left to do but start a collection.
Collecting is a multi-stage process. BOYD retrieves your selected columns and applies any active filter-based classification rules (we’ll explain rules in a minute). It then preserves and applies any pre-existing classifications from previous billing periods, adds a few context columns and saves the collection locally.
With a collection retrieved and loaded, you have a few options. If you’re exploring or just getting started, then you can build filters to review the data in an exportable grid view, or visit the Analysis page for additional chart and display options.
If you’re trying to organize and classify resources, start exploring tag related columns to familiarize yourself with the nomenclature of your environment and the deviations from what might be expected. You can then use the filter and column selections to identify and dynamically fill tag gaps. BOYD allows users to define Classification Keys which are added to datasets during collection. When you define a filter and enter “Edit Mode”, you can edit the classification key values directly in the grid. This will update all rows that match the filter and create an active classification rule that can be managed via Settings and applied during future collections.
BOYD includes monthly reporting and analysis capabilities that can meet most cost reporting use cases. But what if you’re an operations engineer tasked with reducing costs? Or a security engineer surveying an environment for risk or compliance?
“Dig Mode” is where “BOYD the shovel” becomes “BOYD the brush”, gently sweeping away the API dirt to reveal the artifact. “Dig Mode” provides controls for collecting results from AWS get/describe/list API calls, Config Snapshot history items, and recent Cloudtrail activity for supported resources. When a resource is excavated, BOYD analyzes the responses for relationships, attempts to identify if any related resources exist and have been classified, and if so applies the related resource’s classification values to the excavated resource. For an example, suppose you classify all the EC2 instances in an account and region so they are known commodities. Instances have volumes that don’t always get tagged. BOYD can identify if a volume was attached to an instance and attempt to classify it with the attached instance’s values. The same logic applies when excavating snapshots; if a source volume has been classified, BOYD can classify your snapshot as well.
Supported API and Config services are included in our FAQ and once context has been excavated, users can view exportable, grid based and cleanly parsed results. If you have data for services not currently supported by BOYD, reach out to us via support@cloudarchaeologist.com and help us integrate support. We’ve only seen what we’ve seen and are well aware there’s more out there to be included.
How could you use BOYD? One example use case for classification is to supplement data pipelines by using BOYD to create a merge file, which can be uploaded to S3 after collection processing (see Advanced Settings in BOYD) to be consumed and merged with your data pipeline results.
What about cost optimization or security use cases? Again we have a lot of options from the service provider, but you’re limited by sub-par consoles, aggregation limitations and almost assuredly more account and region pivoting or scripting. A simple example is auditing EC2 snapshots. Take a moment to ponder how you’d do that today. There’s the clickOps route of pivoting around the console, but good luck exporting anything meaningful; or you could write a script to cycle through accounts and regions and download the results in a meaningful way. The first approach is a path to misery and carpel tunnel syndrome; the latter is what BOYD does for you.
With BOYD, you can create a filter where product code is “AmazonEC2” and resource ID contains “snap-“ (column names and product codes may vary depending on CUR version). If there are thousands of results, you might want to start tackling them using additional account and region filters, but the hard work of acquiring the meaningful data is all handled by BOYD. Simply select all rows and excavate, then watch BOYD go. When the digging stops, you can filter and analyze the cleanly parsed api results or export to csv. For snapshots that have been deleted, you can use Cloudtrail as a target to identify when (in the past 90 days) the deletion occurred and other related activity (like whether it was the tag defying “Inspector Agentless Scanner” who created it in the first place).
BOYD is ultimately a utility tool that tries to eliminate a lot of the pain points in accessing and curating CUR data and your AWS resources. We hope you’ll give it a try and if you find it useful, would love to hear how you are using it!